


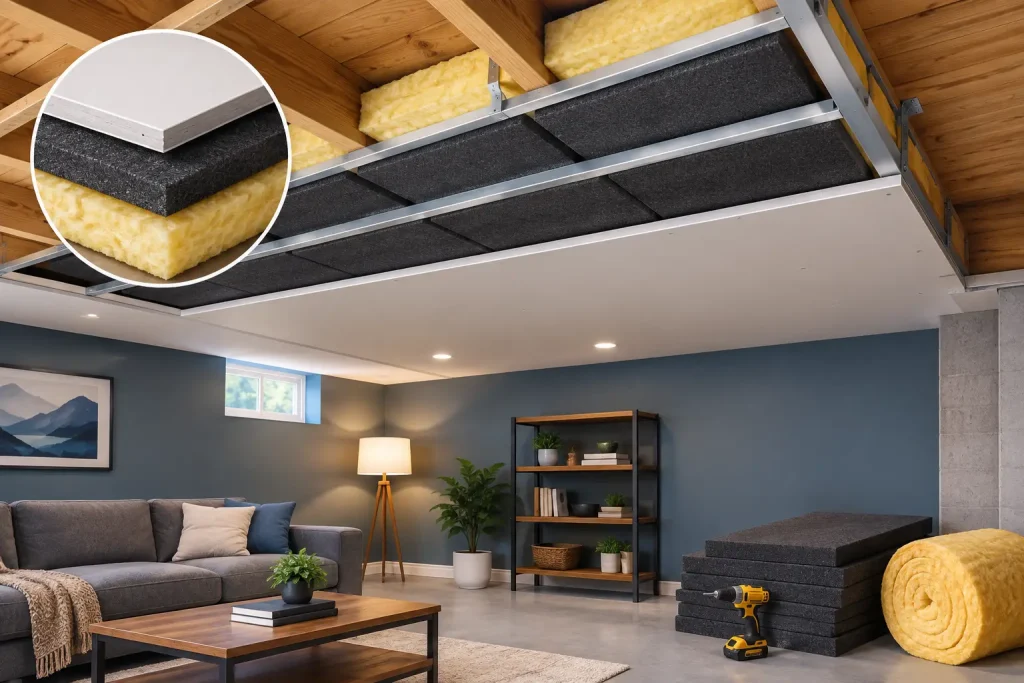
Footsteps overhead can turn a finished basement into a room nobody wants to use. You may hear kids running across the floor, chairs scraping in the kitchen, a TV from the living room, or every step taken on hardwood above. Knowing how to soundproof basement ceiling assemblies the right way means understanding that one material alone rarely solves the problem. A quieter basement comes from a properly built ceiling system, with the right layers installed in the right order.
For Staten Island homes, where basements often become family rooms, home offices, guest spaces, gyms, or rental-ready living areas, sound control is worth planning before the drywall goes up. It is far less expensive and far more effective to handle it during a remodel than to open a newly finished ceiling later.
Start by Identifying the Type of Noise
Not all basement noise travels the same way. Airborne noise moves through the air – conversations, music, television sound, barking dogs, and appliances. Impact noise is created when something physically strikes or vibrates through the structure – footsteps, dropped toys, moving furniture, and exercise equipment.
A basement ceiling needs to address both. Insulation can help absorb airborne sound inside the floor cavity, but it will not fully stop footfall vibrations traveling through joists. For that, the ceiling assembly also needs mass and separation.
This is where many quick fixes fall short. Installing fiberglass insulation between the joists may make a difference, but it usually will not create the quiet, finished space homeowners expect. The best approach combines sound absorption, decoupling, sealing, and heavier ceiling materials.
The Best Way to Soundproof a Basement Ceiling
A high-performing basement ceiling is generally built in layers. First, sound-absorbing insulation is installed between the floor joists. Next, resilient channels or sound isolation clips create a small separation between the framing and drywall. Finally, one or two layers of drywall add mass, with acoustic sealant closing the gaps around the perimeter and penetrations.
Each part of the assembly has a job. Insulation reduces sound bouncing around inside the joist bays. Isolation hardware limits the direct path that vibration takes from the upstairs floor framing into the ceiling drywall. Drywall helps block sound, while acoustic sealant prevents noise from slipping through small openings around edges, pipes, wires, and fixtures.
It is a system, not a single product. When a contractor skips one of these steps, the finished ceiling may still look great, but it will not perform as well acoustically.
Install Mineral Wool or Sound Batts Between Joists
Mineral wool is a strong choice for basement ceilings because it is dense, easy to fit between joists, moisture resistant, and noncombustible. It does not stop every sound by itself, but it absorbs a meaningful amount of airborne noise before it can reach the finished basement.
Fiberglass insulation can also be used, especially when budget is a concern. The key is installing it neatly and continuously without leaving large gaps. Avoid compressing the batts tightly, since compressed insulation does not perform as intended.
Before insulation goes in, the open ceiling should be inspected carefully. This is the time to address plumbing leaks, loose ductwork, exposed wiring issues, and any air gaps around pipes or exterior walls. A finished basement ceiling should not hide problems that will require demolition later.
Decouple the Drywall From the Joists
The most effective ceiling upgrades separate the drywall from the framing. Resilient channel is a thin metal channel installed perpendicular to the joists. It allows drywall to hang slightly apart from the framing, reducing the vibration path that carries sound from upstairs to downstairs.
For higher sound-control goals, sound isolation clips with hat channel are often the better option. They cost more than basic resilient channel, but they can provide more consistent results when installed correctly. This is especially valuable for a basement used as a bedroom, media room, home office, or separate living space.
Installation details matter here. If drywall screws accidentally hit a joist through the channel, the ceiling becomes mechanically connected again, creating what contractors call a short circuit. That one mistake can reduce the value of the whole decoupling system. This is not an area for rushed work or guesswork.
Add Mass With the Right Drywall Assembly
Standard drywall adds mass, but a single layer may not be enough if the goal is noticeable noise reduction. Many soundproof basement ceiling projects benefit from 5/8-inch drywall, which is heavier than standard 1/2-inch board and also offers better fire resistance.
For more demanding situations, two layers of drywall can make a significant difference. A sound-damping compound applied between the layers helps convert vibration energy into a small amount of heat, reducing sound transmission further. This option adds material and labor costs, and it makes the ceiling heavier, so the framing and installation method need to be planned accordingly.
A double-layer ceiling is not necessary for every home. If the basement is a casual recreation room and the floor above is carpeted, mineral wool, resilient channel, and one layer of 5/8-inch drywall may be a practical balance. If the room below will be a quiet office, nursery, bedroom, or theater, the added drywall layer is usually money well spent.
Seal Every Gap Before Finishing
Sound moves through openings surprisingly well. A ceiling with excellent insulation and heavy drywall can still leak noise through unsealed edges, recessed lights, duct openings, outlet boxes, and pipe penetrations.
Acoustic sealant should be used around the perimeter where drywall meets the walls. It stays flexible instead of drying hard and cracking as the house naturally moves. Gaps around plumbing and electrical penetrations should also be sealed with appropriate materials that meet fire and building-code requirements.
Recessed lighting deserves special attention. Traditional recessed cans create holes in the ceiling and may reduce both sound control and fire performance. Surface-mounted fixtures, slim LED fixtures, or properly rated recessed lighting solutions can help preserve the ceiling assembly without sacrificing the finished look.
Do Not Forget the Floor Above
A basement ceiling can only do so much against impact noise. If the upstairs floor is hardwood, laminate, or tile, every footstep is more likely to transfer through the framing. Adding rugs with dense pads, carpeting, or sound-reducing underlayment upstairs can noticeably improve the result.
This does not mean you need to replace an entire floor to make the basement quieter. Even targeted changes can help. Area rugs in high-traffic hallways, a padded mat under workout equipment, and felt pads under furniture legs all reduce the sharp impact sounds that travel downward.
If a major renovation is already planned upstairs, the best time to improve impact-noise control may be during floor replacement. An acoustic underlayment beneath new flooring addresses the problem closer to its source.
Plan Around Mechanical Systems and Ceiling Height
Basement ceilings often include ducts, plumbing lines, beams, electrical runs, and low-hanging utilities. A soundproofed ceiling assembly takes up space. Resilient channel and drywall may lower the finished ceiling by roughly an inch or more, while clips, channels, and double drywall can require additional clearance.
That trade-off needs to be evaluated before work starts, particularly in older Staten Island homes with limited basement height. In some cases, soffits around ducts and pipes are the cleanest option. In others, careful rerouting of mechanical systems can create a more open finished ceiling.
A contractor should also confirm which areas need access panels for shutoff valves, cleanouts, junction boxes, or equipment. A quiet ceiling is valuable, but it should not make future maintenance unnecessarily difficult.
Common Soundproofing Mistakes to Avoid
Homeowners often spend money on foam panels because they are marketed as “soundproofing.” Foam panels can reduce echo inside a room, but they do very little to stop noise coming through a basement ceiling. They are an acoustic treatment, not a true sound barrier.
Another common mistake is installing insulation and expecting silence. Insulation is necessary in many assemblies, but it works best alongside decoupling and added mass. Finally, do not overlook small gaps or improper drywall installation. Sound finds weak points quickly.
Get the Ceiling Built for How You Will Use the Basement
The right soundproofing level depends on the room above and the room below. A basement gym under a kitchen needs a different plan than a bedroom beneath a living room. A finished space intended for guests, work, or entertainment deserves a ceiling assembly that supports privacy and comfort from the start.
Clean Sweep Contracting approaches basement remodeling as a full project, not a collection of disconnected tasks. That means looking at framing, insulation, electrical work, lighting, drywall, finish details, and the practical realities behind the walls before the ceiling is closed.
A quieter basement does more than reduce annoyance. It makes the space feel finished, private, and genuinely usable. Plan the ceiling carefully, use materials that work together, and build it right while the framing is open.